Advanced Numbering
1. What is Advanced Numbering
2. Numbering for Employee ID based on prefix rules
3. Numbering for Employee ID based on department
1. What is Advanced Numbering
With Advanced Numbering you can create individual numberings based on your own rules. This article will provide you with all the needed information on how to create Advanced Numberings and provide two examples.
For Advanced Numbering, we will have to use the PlugIn Registration Tool of the Dynamics 365 SDK.
Download: https://www.microsoft.com/en-us/download/details.aspx?id=50032
More information on usage: https://msdn.microsoft.com/en-us/library/gg309580.aspx
2. Numbering for Employee ID based on prefix rules
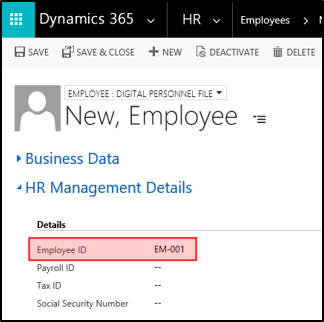
In the first example, we will create a numbering for the Employee ID. We want the Employee ID to look like this: EM-001, EM-002, EM-003 and so on
2.1. Plugin Registration
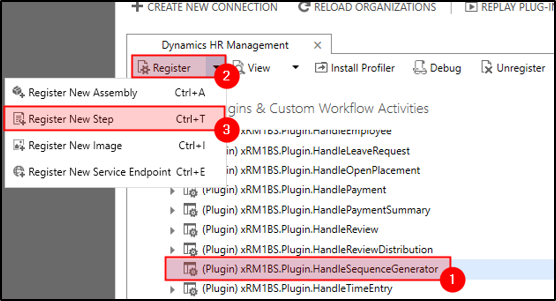
Open the Plugin Registration Tool and log in to your organization.
Expand (Assembly) xRM1BusinessSolutions.Plugins
and select (Plugin) xRM1BS.Plugin.HandleSequenceGenerator
In the top left click on Register and select Register new Step.
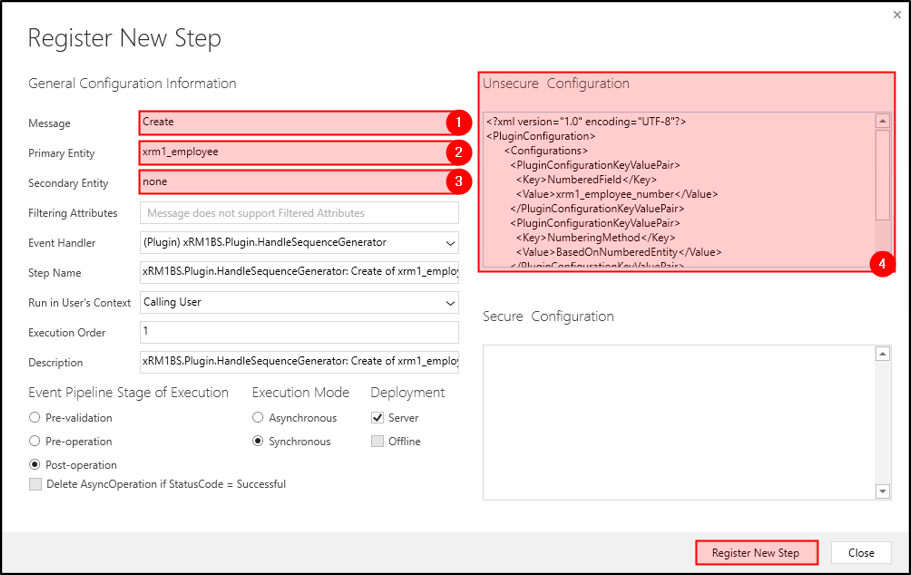
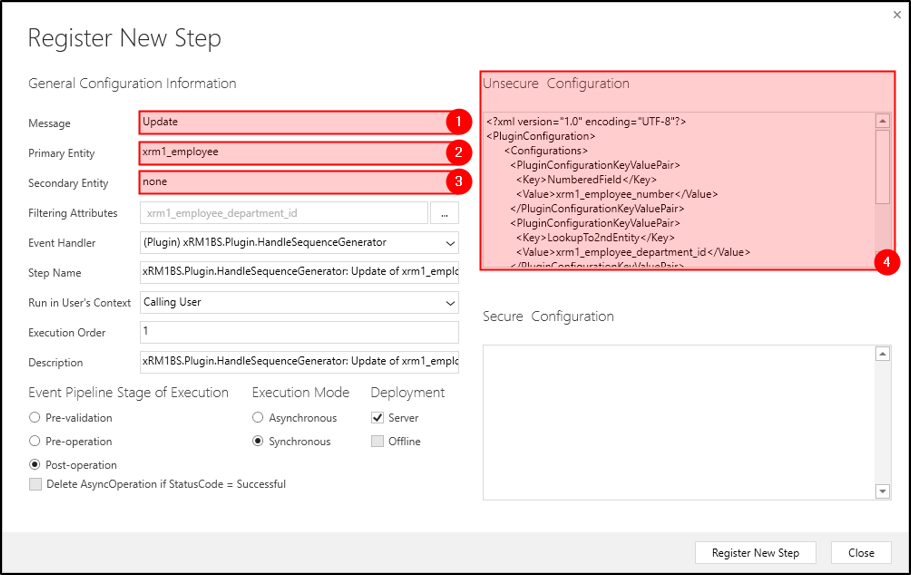
Enter the details as stated below.
(1) Message: Create
(2) Primary entity: xrm1_employee
(3) Secondary Entity: none
(4) Unsecure configuration:
  <?xml version="1.0" encoding="UTF-8"?>
  <PluginConfiguration>
    <Configurations>
      <PluginConfigurationKeyValuePair>
        <Key>NumberedField</Key>
        <Value>xrm1_employee_number</Value>
      </PluginConfigurationKeyValuePair>
      <PluginConfigurationKeyValuePair>
        <Key>NumberingMethod</Key>
        <Value>BasedOnNumberedEntity</Value>
      </PluginConfigurationKeyValuePair>
    </Configurations>
  </PluginConfiguration>
Press Register New Step to complete the registration.
Let’s take a closer look at the unsecure configuration, so you know, what you need to change, if you create a numbering for another entity.
1   <?xml version="1.0" encoding="UTF-8"?>
2   <PluginConfiguration>
3     <Configurations>
4       <PluginConfigurationKeyValuePair>
5         <Key>NumberedField</Key>
6         <Value>xrm1_employee_number</Value>
7       </PluginConfigurationKeyValuePair>
8       <PluginConfigurationKeyValuePair>
9         <Key>NumberingMethod</Key>
10        <Value>BasedOnNumberedEntity</Value>
11      </PluginConfigurationKeyValuePair>
12    </Configurations>
13  </PluginConfiguration>
On line 4-7, we define the field using the numbering. The key is NumberedField, the value can be nearly every field. In this example, we want to fill the Employee ID, so we use xrm1_employee_number as value.
On line 8-11, we define the NumberingMethod. This key can take two values, BasedOnNumberedEntity or BasedOn2ndEntity. In this example, we will use BasedOnNumberedEntity as value.
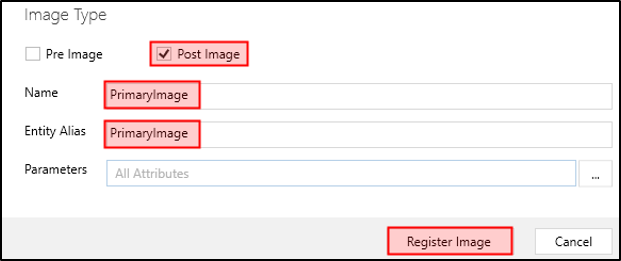
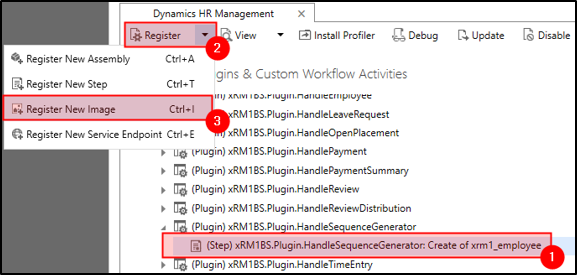
Select the new step, open Register in the top left and press Register New Image.
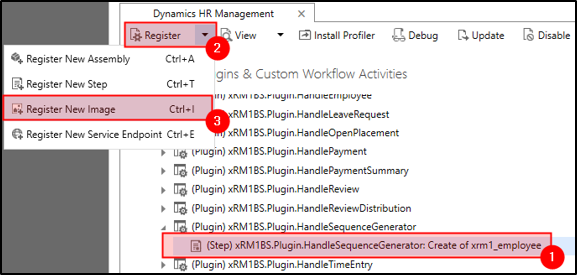
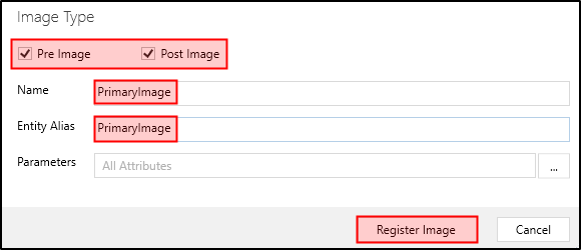
Enter the details as stated below:
Make sure, only Post Image is checked.
Name: PrimaryImage
Entity Alias: PrimaryImage
To complete the registration, press Register Image.
This completes the first step. We can now log in to Dynamics 365 and configure our numbering.
2.2. Configuration
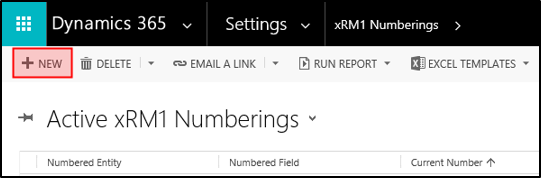
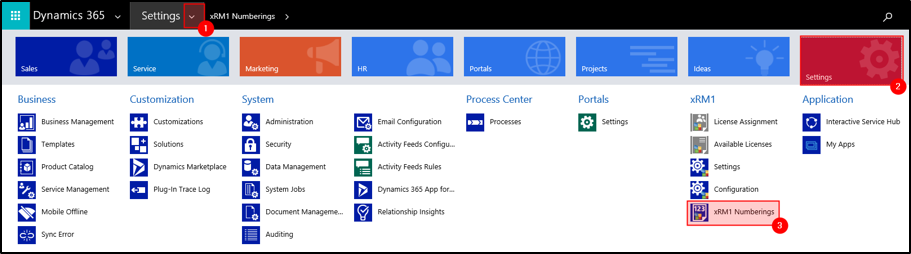
Go to NavBar -> Settings -> xRM1 Numberings

In the top left, click New to create a new numbering.
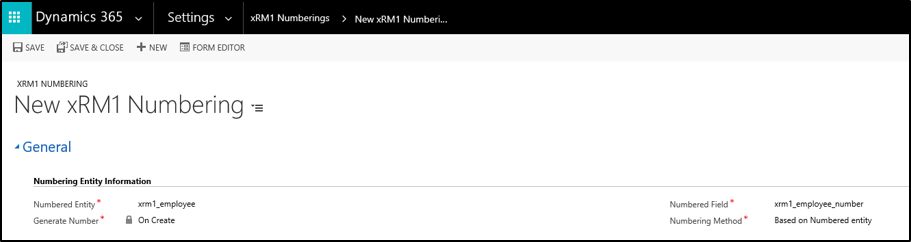
Enter all the details in Numbering Entity Information as you have defined them within the Unsecure Configuration in the Plugin.
In our example:
Numbered Entity: xrm1_employee
Numbered Field: xrm1_employee_number
Generate Number: On Create
Numbering Method: Based on Numbered entity
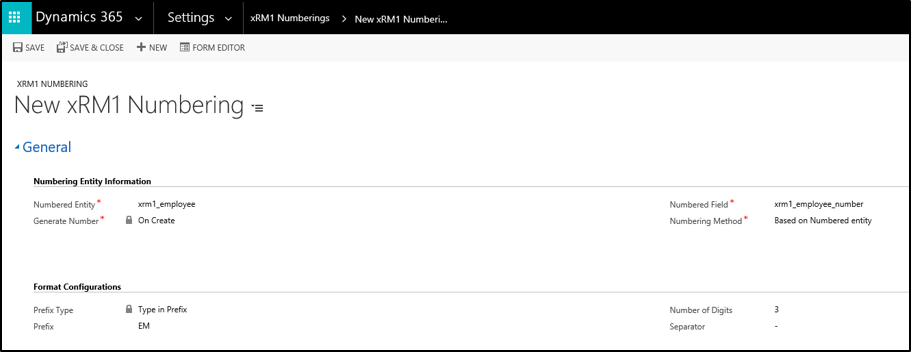
In the next section, Format Configuration, you can specify, how your numbering will look like.
In our example, we want our numbering to look like this: EM-001, EM-002, EM-003,…
To get this result, we define EM as a prefix, a minus as Separator and use 3 digits to count our employees.
Press Save & Close.
More information:
Prefix: Up to 10 characters
Number of digits: 3-10
Seperator: Up to 3 characters
We can now test our numbering. We create a new employee and check, if the numbering is correct.
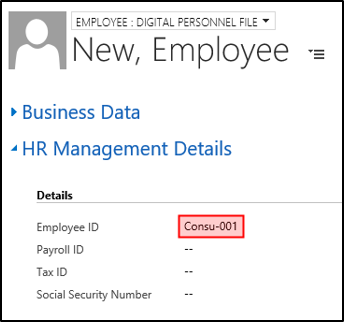
3. Numbering for Employee ID based on department
In the second example, we will again create a numbering for the Employee ID. But this time, we want it to be different depending on the department the employee is working for.
It will look something like this: Sales-001, Sales-002, Consulting-001, HR-001, HR-002 and so on
3.1. Plugin Registration
Open the Plugin Registration Tool and log in to your organization.
Expand (Assembly) xRM1BusinessSolutions.Plugins
and select (Plugin) xRM1BS.Plugin.HandleSequenceGenerator
In the top left click on Register and select Register new Step.

Enter the details as stated below.
(1) Message: Create
(2) Primary entity: xrm1_employee
(3) Secondary Entity: none
(4) Unsecure configuration:
  <?xml version="1.0" encoding="UTF-8"?>
  <PluginConfiguration>
    <Configurations>
      <PluginConfigurationKeyValuePair>
        <Key>NumberedField</Key>
        <Value>xrm1_employee_number</Value>
      </PluginConfigurationKeyValuePair>
      <PluginConfigurationKeyValuePair>
        <Key>LookupTo2ndEntity</Key>
        <Value>xrm1_employee_department_id</Value>
      </PluginConfigurationKeyValuePair>
      <PluginConfigurationKeyValuePair>
        <Key>NumberingMethod</Key>
        <Value>BasedOn2ndEntity</Value>
      </PluginConfigurationKeyValuePair>
    </Configurations>
  </PluginConfiguration>
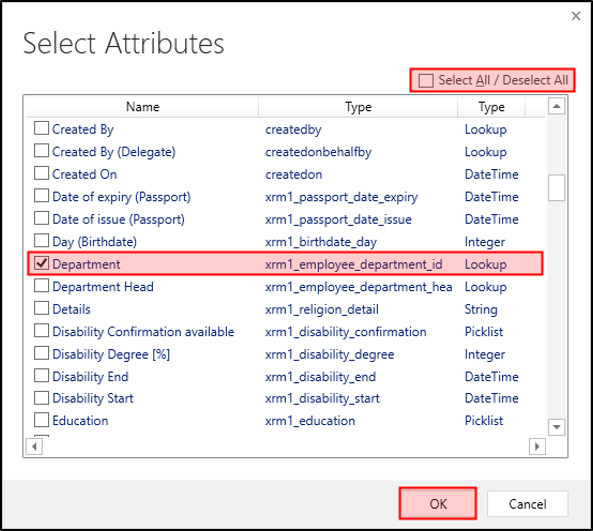
To set Filtering Attributes, select the ellipses.
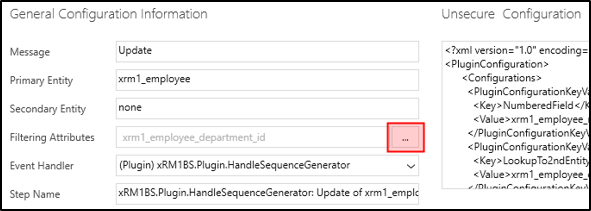
Deselect all fields except xrm1_employee_department_id and press OK.
Press Register New Step to complete the registration.
Let’s take a closer look at the unsecure configuration, so you know, what you need to change, if you create a numbering for another entity.
1   <?xml version="1.0" encoding="UTF-8"?>
2   <PluginConfiguration>
3     <Configurations>
4       <PluginConfigurationKeyValuePair>
5         <Key>NumberedField</Key>
6         <Value>xrm1_employee_number</Value>
7       </PluginConfigurationKeyValuePair>
8       <PluginConfigurationKeyValuePair>
9         <Key>LookupTo2ndEntity</Key>
10        <Value>xrm1_employee_department_id</Value>
11      </PluginConfigurationKeyValuePair>
12      <PluginConfigurationKeyValuePair>
13        <Key>NumberingMethod</Key>
14        <Value>BasedOn2ndEntity</Value>
15      </PluginConfigurationKeyValuePair>
16    </Configurations>
17  </PluginConfiguration>
On line 4-7 we define the field using the numbering. The key is NumberedField, the value can be nearly every field. In this example, we want to fill the Employee ID, so we use xrm1_employee_number as value.
On line 8-11 we define the LookupTo2ndEntity, which is in our example the xrm1_employee_department_id. This can be nearly any lookup field, it just depends on what you want.
On line 12-15 we define the NumberingMethod. This key can take two values, BasedOnNumberedEntity or BasedOn2ndEntity. In this example, we will use BasedOn2ndEntity as value, because we want the numbering to change depending on the department.
Select the new step, open Register in the top left and press Register New Image.
Enter the details as stated below:
Make sure Pre Image AND Post Image is checked.
Name: PrimaryImage
Entity Alias: PrimaryImage
To complete the registration, press Register Image.
This completes the first step. We can now log in to Dynamics 365 and configure our numbering.
3.2. Configuration
Go to NavBar -> Settings -> xRM1 Numberings
In the top left, click New to create a new numbering.

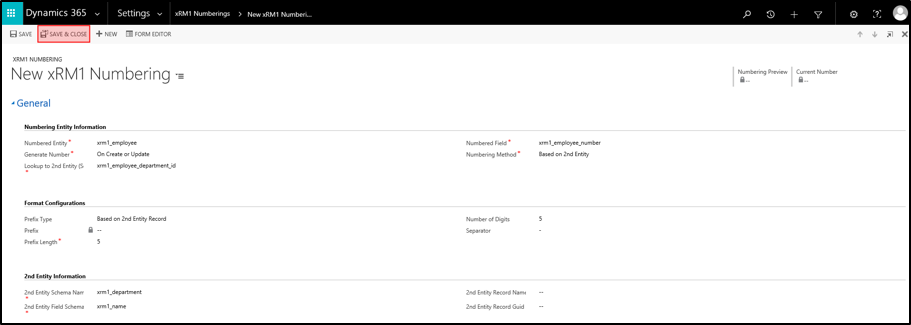
Enter all the details in Numbering Entity Information as you have defined them within the Unsecure Configuration in the Plugin.
In our example:
Numbered Entity: xrm1_employee
Numbered Field: xrm1_employee_number
Generate Number: On Create or Update
Numbering Method: Based on 2nd Entity
Lookup to 2nd Entity: xrm1_employee_department_id
We also need to provide some 2nd Entity Information.
In our example:
2nd Entity Schema Name: xrm1_department
2nd Entity Filed Schema: xrm1_name
Finally, we will define the Format Condiguration.
In our example:
Prefix Type: Based on 2nd Entity Record
Prefix Length: 5
Number of digits: 3
Separator: a minus
Press Save & Close
We can now test our numbering. We create a new employee and check, if the numbering is correct.